Monday, December 27, 2010

An epiphany worth noting

Yesterday I had an epiphany. These epiphanies come with absolutely no warning and occasionally at the most inopportune moments. But they are epiphanies none the less. So this particular epiphany (have you noticed the word epiphany starts to sound really funny when you say it over and over?) happened in part because of my bathroom wallpaper. Which I will now show you.
Notice the flecks of metalic copper. I really love love love this effect and wanted to create it on paper. Or at least a similar effect. And so here is a tutorial of how I did exactly that. I used: no stick craft sheet (I use ranger inks because I <3 them), perfect pearls in heirloom gold, victorian velvet distress ink, walnut stain distress ink, mini mister, heat tool, ink blending tool, kitchen sponge, annnnnnd of course paper.

Step 1.
I inked the paper in victorian velvet. I've had an obsession with that color as of late. Starting on the craft sheet of course so you don't get harsh lines. Although the paper is going to get wet so it is going to blend some.

Step 2.

Ink craft sheet in walnut stain. Note that this step is obviously optional. I just like the look of it.

Step 3.

Take your already premoistened and wrung out kitchen sponge and wipe up all the inky goodness. It should look like such:

If it doesn't look inky enough just add more.

Step 4.

Sponge your inked paper! I did it lightly so as not to drench it by squeezing water out of the sponge. You really just want to stamp it lightly.

Step 5.

Blast it with the heat tool til dry. Pretty nifty effect ay?

Step 6.

Take a craft stick full of perfect pearls and dump it on your craft sheet. I used heirloom gold, that is my absolute favorite color. You can use more or less depending on the effect you want.

Step 7.

Mist it!!!!! Remember perfect pearls has a fixant that works as soon as its made wet. So be sure to close your jar before you start misting :)

Step 8.
Dunk your sponge in it. (after rinsing the ink out of it, incidentally) I liked using just one corner of the sponge for this. I felt like I had more control and like I wasted less perfect pearls.

Step 9.
Repeat the light stamping motion. If you feel like the paper is damp you can blast it real quick with the heat tool again. I found it dried pretty fast so I didn't have to.

Step 10.


All done! I took these with my point and shoot so they came out absolutely terrible but I took a few different pics with and without flash so hopefully you can get an idea of the effect it gives you. I just love it! Expect to see this effect on a lot of my work to come.  Until I get bored of it and move on to something else :)
Tfl!

Wednesday, December 22, 2010

Oldies but goodies

I thought I would just upload a bunch of my older work into one post. I've been really lazy about getting it up here. But I've been sitting on my butt all day sick with a head cold, so what better time to upload some oldies but goodies?
This is one of probably 3 of my wedding pictures that I have scrapped. So I'm at a pretty good pace. I've been married 3 years so thats like 1 wedding layout a year. So I'll have a whole wedding scrapbook just in time for our 20th anniversary :) I really love the color palate on this one. I don't know why. I used a lot of copper stickles to try to bring out the orange. This layout sparkles so much more in person. When I made this layout I had just discovered how much fun it is to splatter ink, paint, glimmer mist, and other mediums using a toothbrush and craft stick. I believe pretty much all layouts from that period in time have some sort of splatter on them. I love the effect. (Although I think I have much better balance with using said splatter effect now.)

Ignore the crooked pearls! This is the second of the 3 wedding layouts I've done so far haha. I went a little crazy with the embellies on this but a lot of the time those end up being the layouts I love the most. I painted antique linen distress stickles on the die cuts and on the roses on the background pp. Really nice effect. I recommend painting antique linen stickles on pretty much everything forever :) Also did some distressing (obviously) and inking with antique linen. I use that ink pad the most, it's starting to go dry :(

This is really simple. Sheet of bazzil, some cosmo cricket, meadow green and gold glimmer mist, some prima packaging (don't you love how you can buy the packaging seperate now?), and some stamping with archival ink. And thickers. And stickles. Ok this is starting to sound more and more complicated the more I babble on. But its really not.

This layout! I don't know what I was trying to do, and I don't know what I had in mind while I was making it. But there it is. Some days I look at it and I cringe, other days I look at it and love it. So who knows. I truly cannot remember how I got that background effect. This is so much more shimmery in person. I believe this was the result of one of my mad scientist spells. So if you want to try to duplicate the background, your guess is as good as mine.
Thank you for looking! :)

Sunday, December 19, 2010

And heres some more pages...

As promised heres some more pages from my latest project. I love designing pages this size. Its very similar to an atc, a little bigger. But they're just fun to make!


Lots of distress lots of inking and lots of glimmer misting! Funnnnn! Thank you for looking :)

Thursday, December 2, 2010

Very productive day

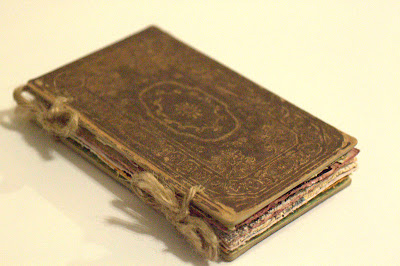
Today was very productive. I had my first photography lesson with my favorite professional photographer bff Melissa Fogg yay! She's my favorite out of all my professional photographer bff's haha. I'll post some fun pics from that later. Annnnnnnd after that I finally took some pictures of my latest project. I bought some book covers by 7 gypsies and just wanted to make something really unique that I could just put anything I wanted in it. So heres just a few pictures of the cover and inside the cover. I'll post more pics of the inside later.  I just have it bound with twine right now, although I may decide to change that later. Its nowhere near done, I plan on adding a lot more pages, but this is where its at currently.


For the inside cover, I glued on pp with zip dry and then I sanded the edges down really good and then inked the edges throughly with antique linen distress ink. One of my favorite colors. Yay! I'm realllllllly happy with the results! tfl!

Thursday, October 28, 2010

Scraproom progress

Two rolls of painters tape, 1 can of super duper primer, and 1 1/2 cans of paint later HALF of my scraproom is painted. Fortunately its the important half :) So my very dear husband has started to assemble my desk for me. He's very handy like that. I'm sooo excited about being able to get things put away and actually do some scrapping in there! What a bizzare concept. So heres some pictures of the current state:


So as you can see its still a MESS haha. But at least progress has been made and I can finally start organizing and putting away some of my stuff. So the next item on the list is to hang my MM embellishment center which is going right above my desk on the purple wall. So I'm excited about that. See the little damask looking thing to the right of my chair? Its a little closet organizer I found at target for shoes. It was like $1 and I attached it to the underneath of my desk with velcro, so that its moveable, and I'm using it currently for punches and my heat embosser and Irock tool. Not bad for a dollar. I'll update again once its done, which hopefully will be soon!

Sunday, October 3, 2010

Scrapped in Raleigh

This layout I actually scrapped in Raleigh, NC. We were on our way down to Orlando and stopped for two nights in Raleigh. Partially so we could have a break from driving, but mostly because I wanted to go to Archivers. So I knew that after buying all those amazing goodies at Archivers, I was going to want to use them. So this particular layout was scrapped at the Best Western somewhere in Raleigh.


My husband thought I was crazy, he told me so. But I enjoyed myself throughly and didn't make too much of a mess. Perhaps they won't notice the marshmallow glimmer mist on the bed spread.... Ok so this layout is quite simple, obviously. Some basic grey, sheet of bazzil, prima pearls and flower, marshmallow glimmer mist as stated, annnnd it also gave me the chance to use my new Tim Holtz tiny attacher that I won for national scrapbook day over on scrapbook.com. Very simple, but I like it. 

Tuesday, September 28, 2010

Graceful Moments Photography


If you appreciate fine photography, check out Graceful Moments Photography done by my dear friend the amazing multi-talented Melissa Fogg. She does such amazing, unique and creative work. Her website is Graceful-moments.com and you can also keep updated by following her blog photographygracefulmoments.blogspot.com.


Saturday, September 25, 2010

The mad scientist presents...

Every so often when I randomly get inspired, I go into what my husband calls my mad scientist mode. I have absolutely no concept of time or anything else really. I sit in the middle of my living room floor, indian style, and am throughly burried in inks, papers, glimmer mist, primas, punches etc etc. This canvas was the result of one of my mad scientist spells. The mess in my living room afterward was amazing. It truly was.


This was sooo much fun to do. I knew I wanted a watercolor background effect. So I used my nonstick craft sheet and lots of colors of distress ink with my mini mister. I also used a ton of glimmer mist. I did some masking. The flowers in the lower corner were stamped with archival ink. Annnnd everything is adhered with zip dry. And its holding up quite well. It was well worth the mess :)

Tuesday, September 14, 2010

A touch of the bubbly...

So I was inspired one day to attempt stamping with bubble wrap, since everyone else does it and it looks awesome. This was the end result.

So bubble wrap really is good for something other than for therapeutic popping :)

Happy blogging and bubble wrap popping

Tuesday, August 31, 2010

Here goes nothing...

I don't know how good I'm going to be at this whole "blogging" thing so here goes nothing.
My name is Bre, I've been scrapbooking for about a year and a half... although I've always had scrapping tendencies. I'm in the midst of constructing my scraproom. Kind of at a stand still at the moment, but I'm hoping to get it done soon because as of now I have no access to my scrappy stuff. So I'll probably just be posting some older work for now until I can get my desk reassembled and stuff put away. Hopefully before the next decade. Although occasionally when I can't take the lack of scrapping anymore, I'll bring some stuff out and plop it on the living room floor to work. But of course that makes a mess, so I try to resist the urge. :) Ok so moving on. I recently took my first trip to archivers (the one in raleigh, NC), which was an amazing experience by the way, and got a buttload of goodies, including one of the 7 gypsies letterblock printer trays. I had waaaaay too much fun altering it. So I thought I would open up this poor excuse of a blog with that.


Lots of fun goodies on that. I used mostly all 7 gypsies paper because its just so darn pretty. And I used some of Tim Holtz fragments for the first time. I am now obsessed with them. Melody Ross brads, Jenni Bowlin butterfly, rusty hinge distress ink, and prima flowers and pearls. Ooooh and its all adhered to the tray with zip dry, and its holding up well. I think that covers everything. It was really fun to make. I think the only thing that was a pain in the butt was cutting the paper just right to fit in the trays. But thats ok. Happy blogging.